WAVE THE FLAG for Whitby's 60th Logo

Logo Contest Design with Mr. Lohmeyer's 8th Grade Class

Logo Contest Methods that Work!

WAVE THE FLAG: Project Management with Mr. Lohmeyer's Design Flags (2017)

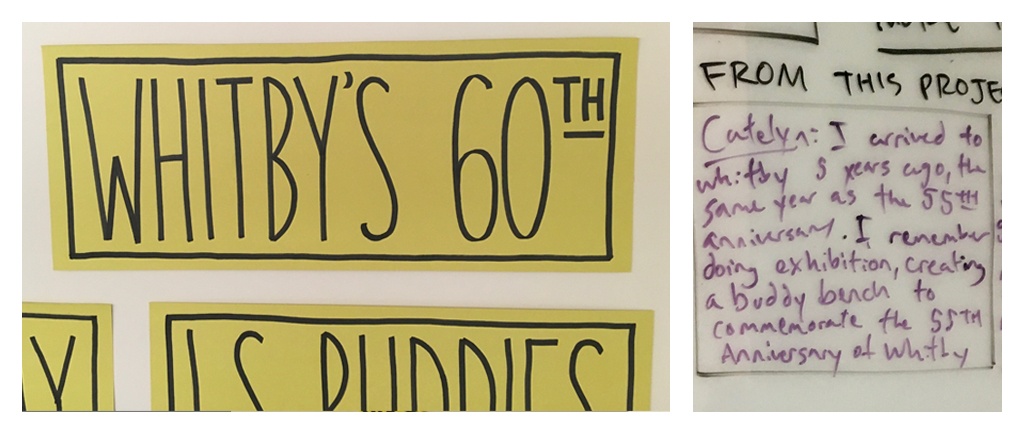
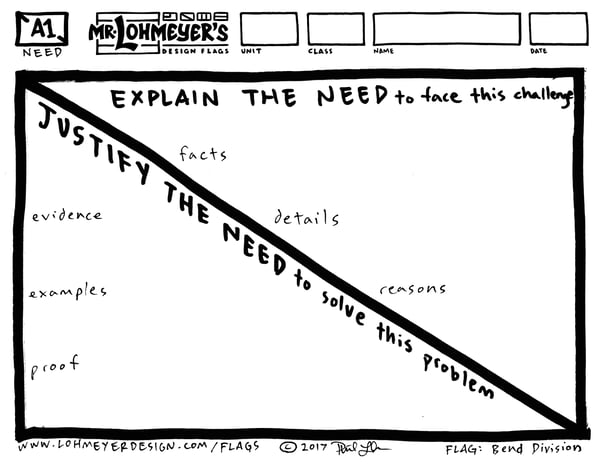
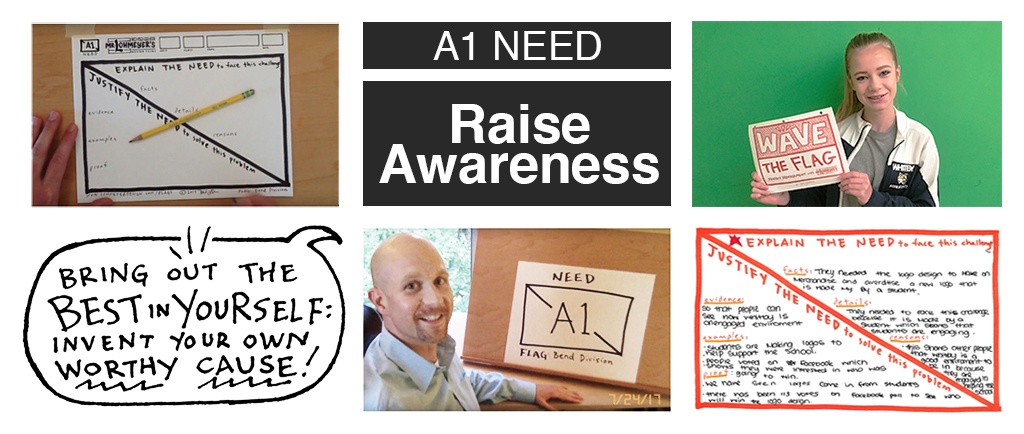
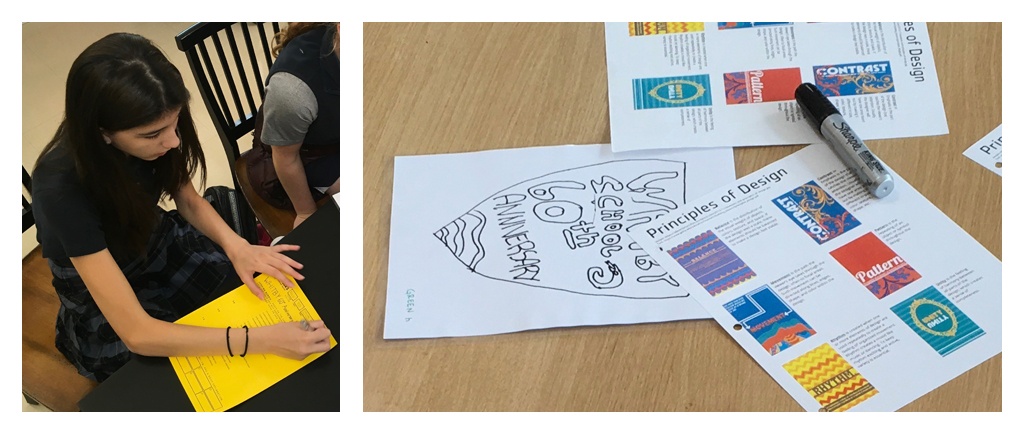
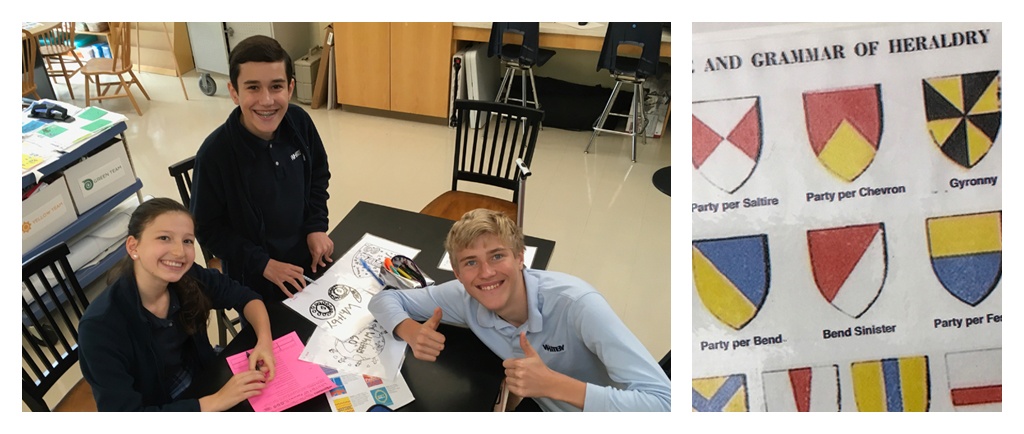
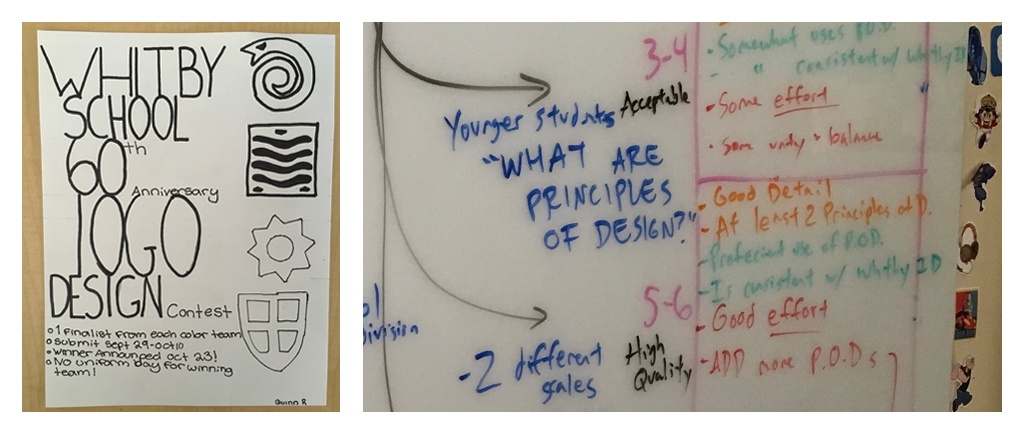
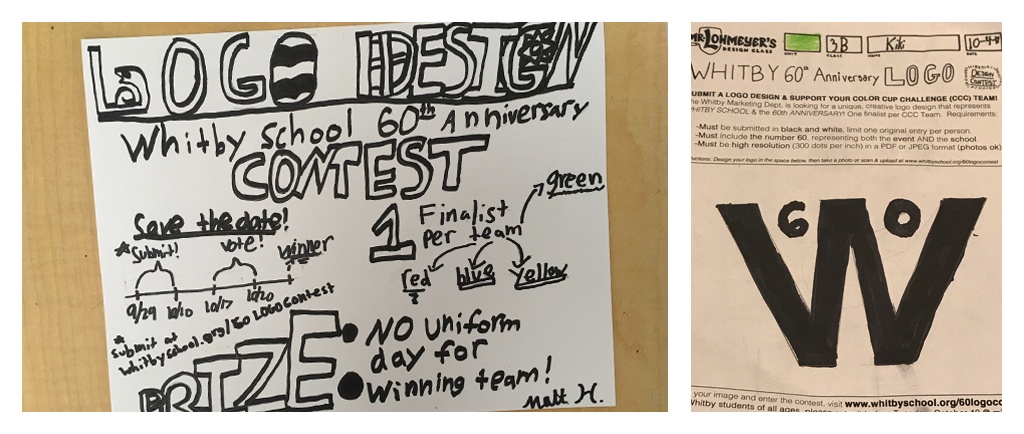
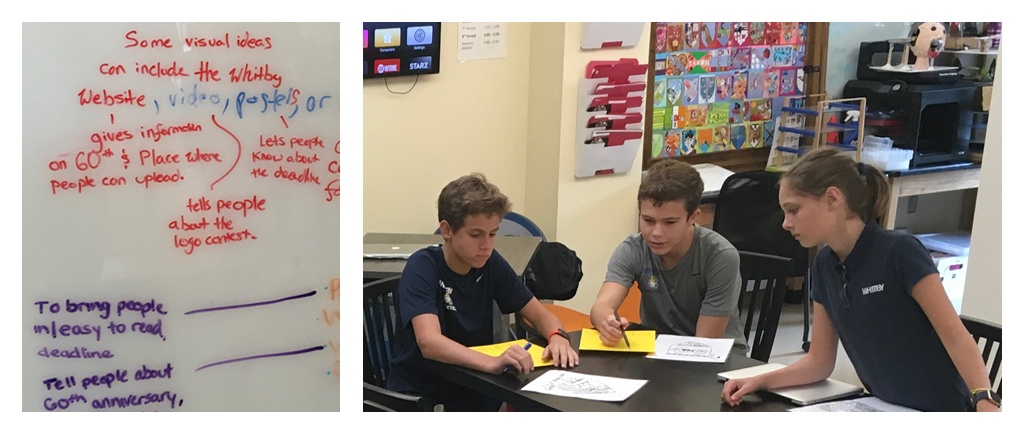
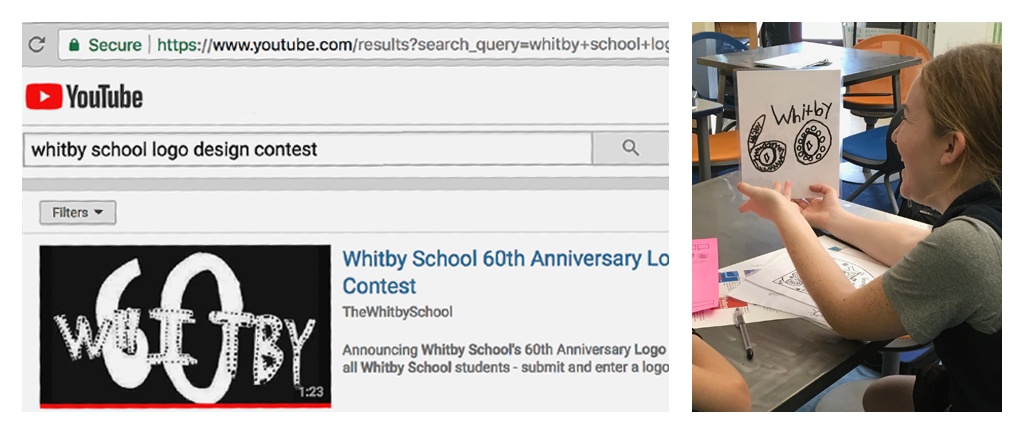
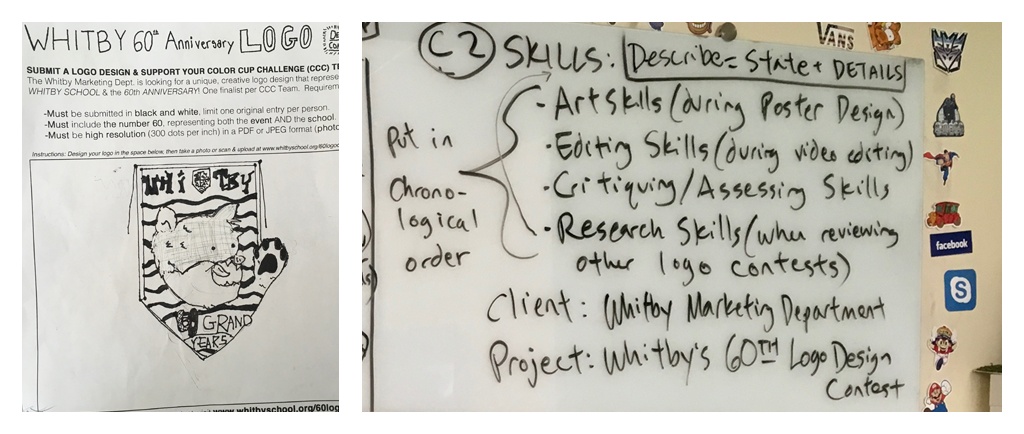
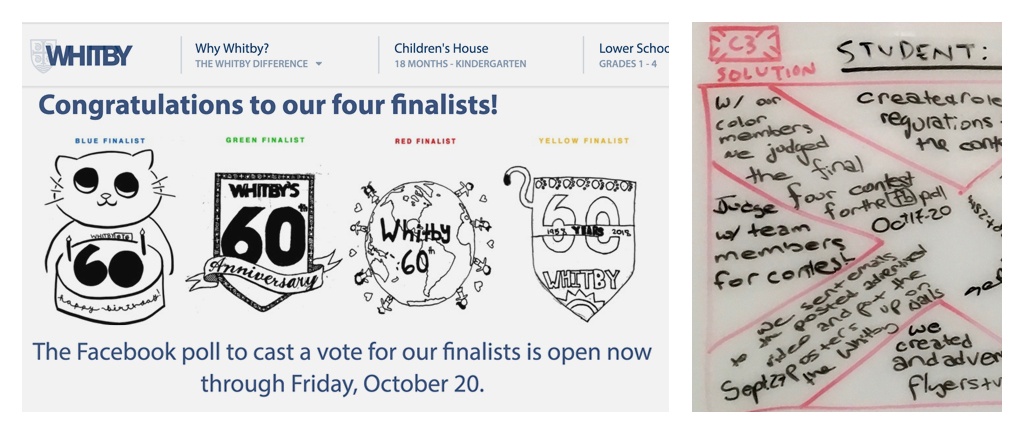
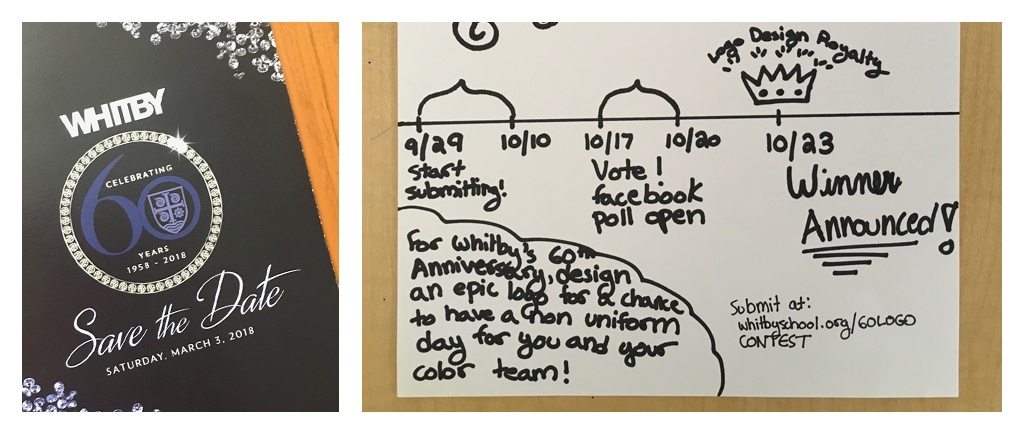
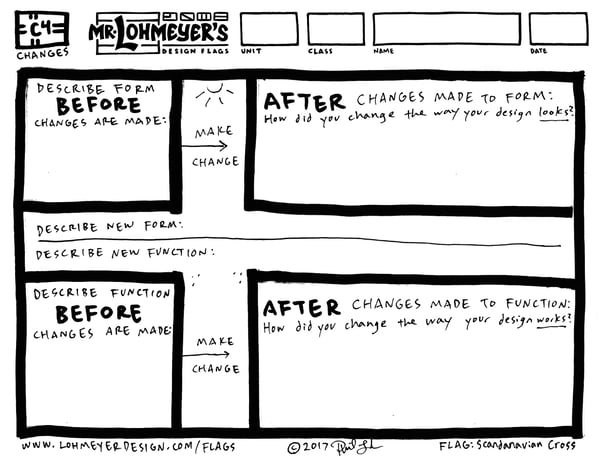
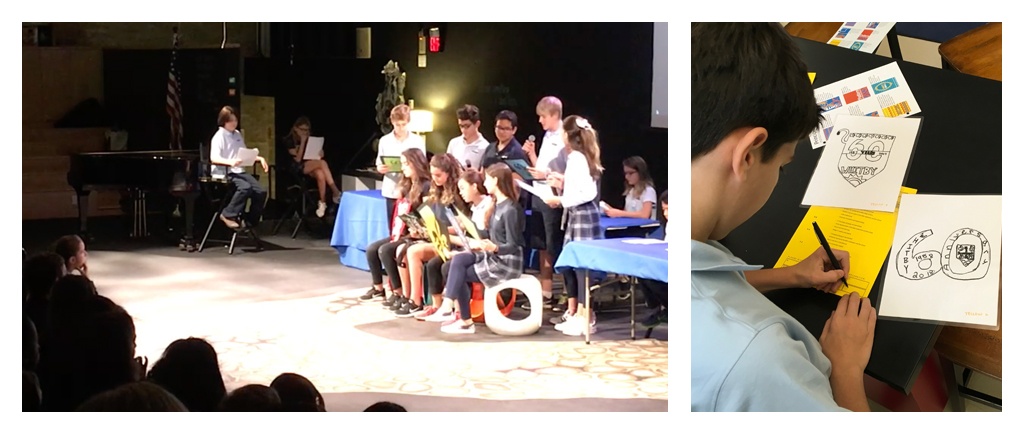
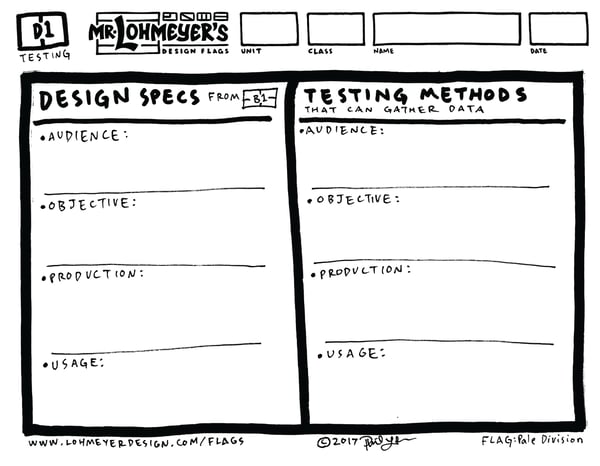
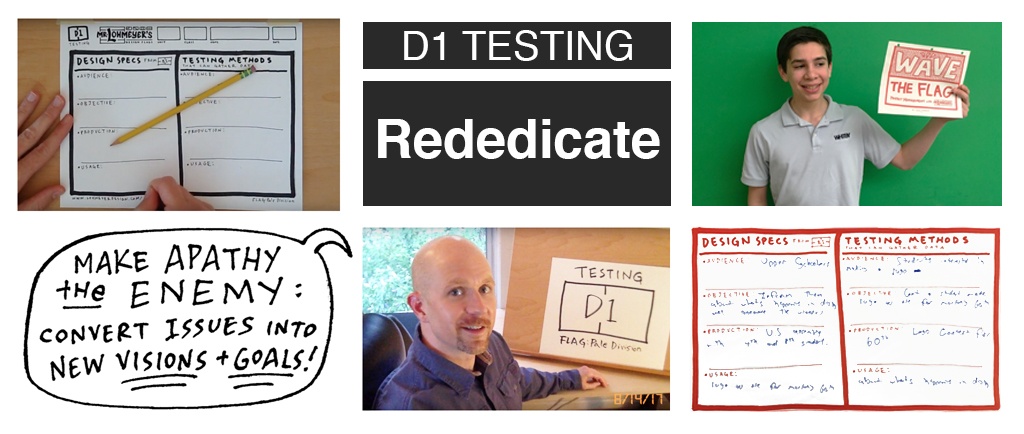
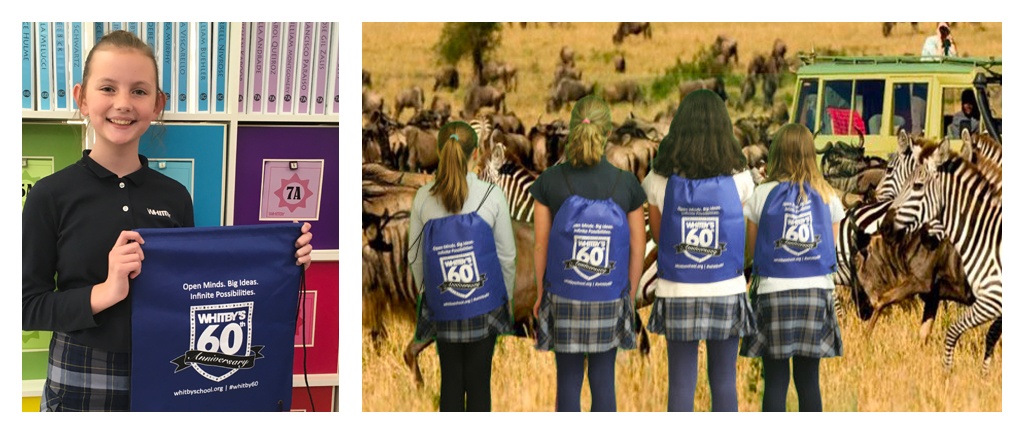
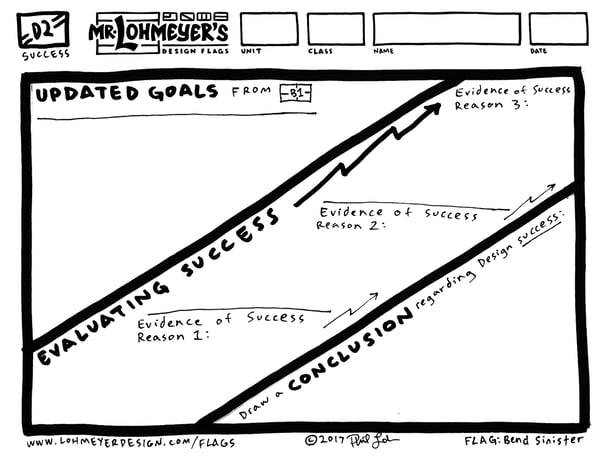
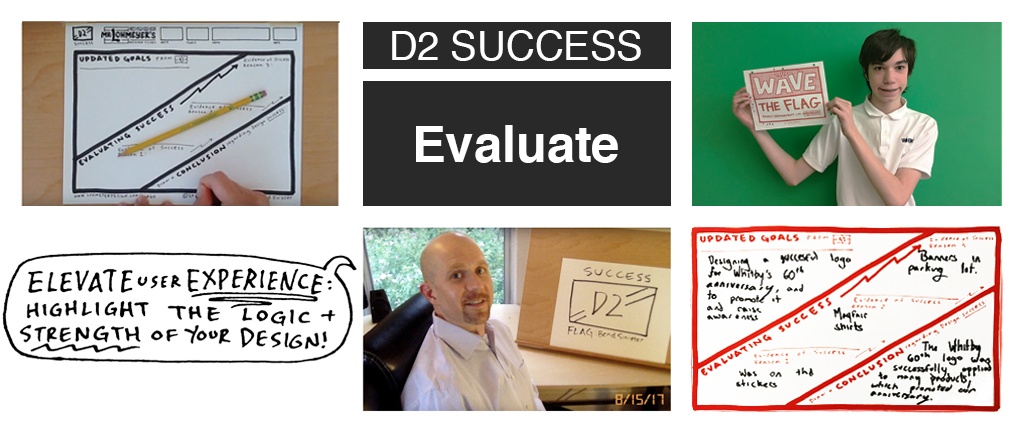
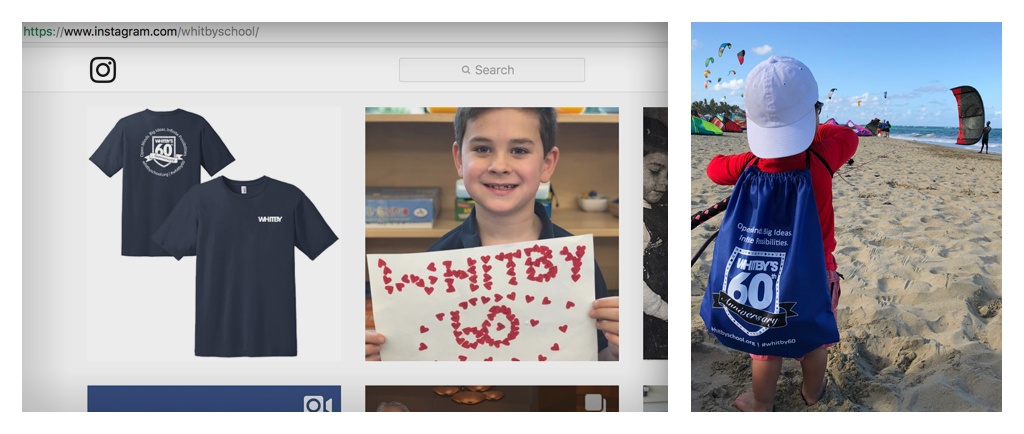
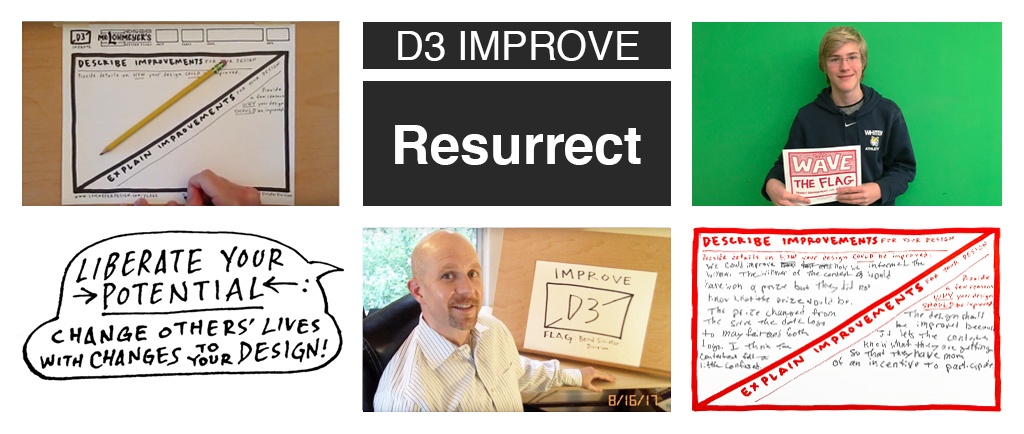
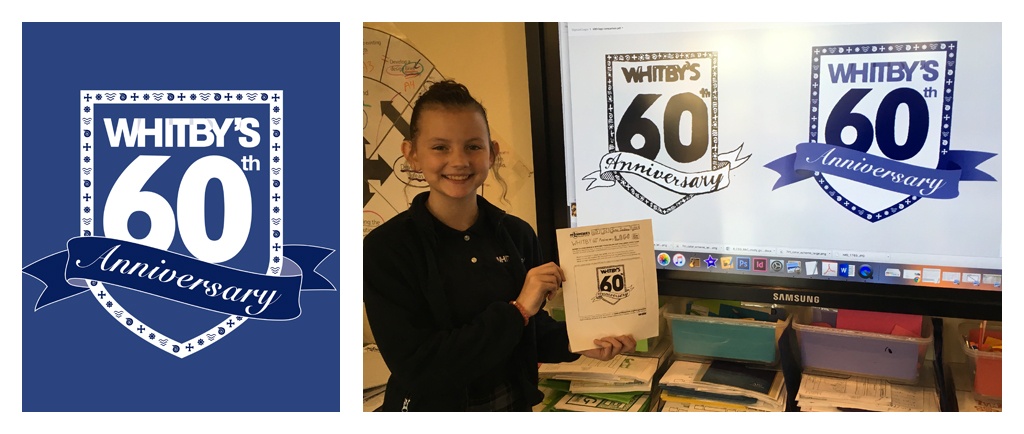
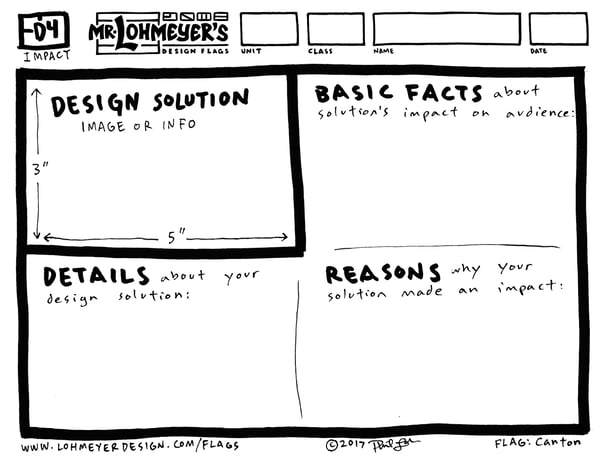
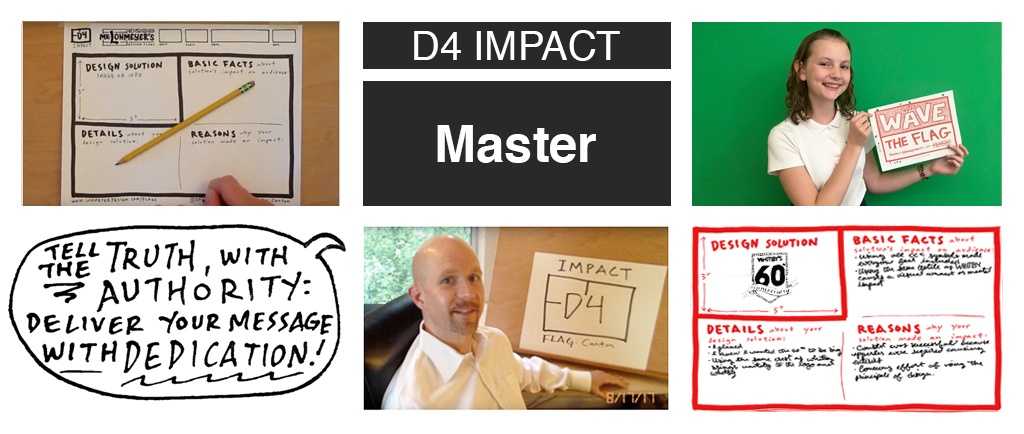
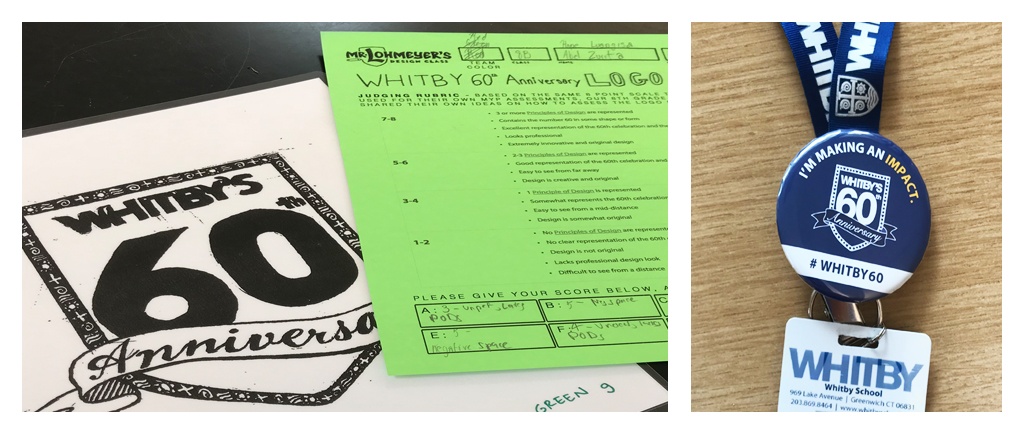
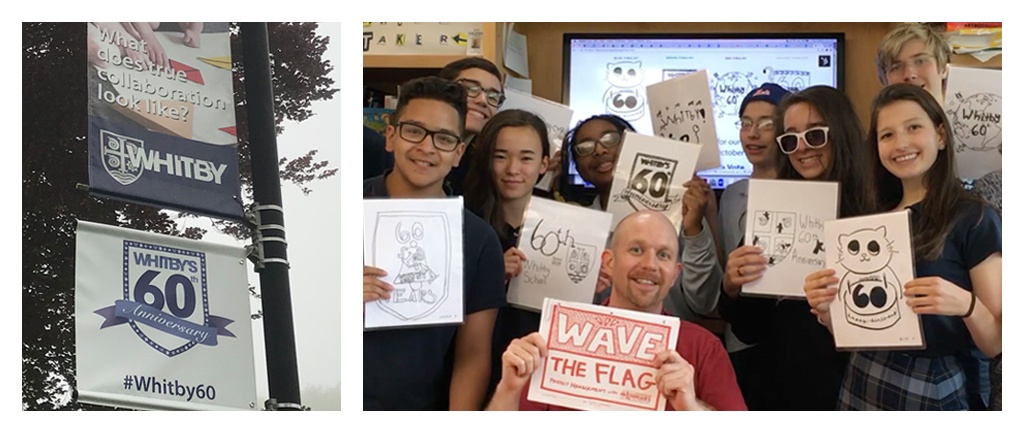
This series of posts will improve your Project Management skills, and show you how Whitby's Class of 2018 used this method successfully to create a Logo Contest for our 60th Anniversary. With these pages from WAVE THE FLAG: Project Management with Mr. Lohmeyer’s Design Flags (2017), designers can find common ground here, in the brainstorming process.  This project began in September of 2017 and was completed in January of 2018, in the Upper School Design Department of Whitby School in Greenwich, CT.

IMG_1046 (2)

Do you have a large project you’ve been hoping to tackle, but you're just not sure how to start? Let’s use flag designs to walk through an entire project: your own! Follow Whitby's Class of 2018 each week, and learn how to navigate through challenging project tasks. After 16 weeks, their project will be completed.  You can also follow the 8th graders' Design process, as they used the WAVE THE FLAG system to find Whitby’s 60th Anniversary logo. Thanks again, and best of luck with your project! Here’s the first step….


A1 NEED: Raise Awareness (1/19/18)

Wave_the_Flag_A1_image4

I’ve always appreciated flag designs, but only recently did I realize that flag designs reveal the most effective ways to organize information. For this exercise we will use the flag design known as a Bend Division, and we’re talking about NEED. You need to make sure that everyone on the team known WHY you are creating this design... which in this case, is for Whitby's 60th Anniversary.  So, to identify the need, you will first explain it, then you will justify it.  This sheet can be used to tackle the first stage of inquiring and analyzingjust like 8th grader Catelyn did at the end of this post!

You might think the reasons you're designing something are very obvious, but clearly explaining your reasons, with justification and the help of this flag, will come in handy during the design process, especially when looking for motivation! Using the Bend Division flag design — with the diagonal line going from the top left to the bottom right — can give you a new way to organize your thoughts on why you are designing something.  Try to write one sentence to summarize your need to design this, starting with “I’m making this design because,” and remember to include justification.

08_wave_the_flag_book_A1_jpg

8th grader Catelyn (Class of '18) writes...

“Whitby’s Marketing Department needed a design for Whitby’s 60th Anniversary for all of the merchandise.  They wanted to use a logo that is made by a student because this shows student engagement. It also shows others that Whitby is a good environment to be in, because students are helping the school. We need logo entries to come in from students, and people to vote on a Facebook poll.  Then we need to see who is going to win!” -Catelyn 

A1_blog_image-1

A2 RESEARCH: Find Your Adventure (1/26/18)

Wave_the_Flag_A2_image

With these posts, I want to help people make connections and see patterns using the organized patterns of flag designs.  What is the next piece of your design puzzle?  If you completed the first flag (A1 NEED), and hopefully it was helpful, here’s a chance to use a timeless flag design with Pales to organize your research plan.  That way you can increase your awareness of the design category, without wasting time.  So even if you don’t know all that much about your design topic, you can go into it knowing a lot about planning your research.

This flag design will help us effectively explore research that you COULD do on this topic, and a few research methods as well. Most people would rather dive right in, start Googling randomly on their phone, but you can waste a lot of time that way. Always PLAN your research so you are making the most effective use of your time. This flag will help us with that. A flag design with Pales, or vertical stripes, we can create a new path for your project. Prioritizing our research will also help us use our time effectively. This flag can be used during the second stage of Inquiring and Analysing, just like 8th grader Victoria did at the end of this post!

8th grader Victoria (Class of '18) writes...

“We researched other schools’ websites, to find examples of existing Logo Design contests, and create a grading rubric for our own contest.  By doing this, we could see who won, and discover what style worked for the winner and their competitors.  We also spent time looking at the Principles of Design and past classwork, to find ways of using Balance, Contrast, Movement, Pattern, Rhythm, and Unity in our contest grading rubric.  Lastly, we researched past Whitby Facebook polls, and took notes to see how we can use this survey method to find a winner!” -Victoria

A3 PRODUCTS: Meet your Mentors (2/2/18)

Wave_the_Flag_A3_image2

Some people might be hesitant to believe the full impact that these Design Flags can have.  But, after using this flag with a symmetric cross that will help you gain inspiration from existing products, I think you’ll be sold.  It’s possible that you know very little about the existing designs in your category, this sheet should help you to learn more.  To identify the existing products that may inspire you, it always helps to find some visuals.  What does your design category look like?

You might think, “I already know my inspirations,” or, “I can’t think of 4 different existing products,” but I would encourage you to try.  Putting images of 4 different existing designs right in front of you, and looking at them all together while brainstorming, can really help to spark inspiration.  Using the Symmetric Cross flag design, with the rectangles in the four corners of the flag, should help to inspire multiple solutions to your design problems.  The flag is multifunctional, dividing your page so you can brainstorm in an organized way, in a memorable pattern, so you can study more than 1 existing product, and brainstorm potential solutions.  Use this flag during the third stage of Inquiring and Analysingjust like 8th grader Quinn H. did at the end of this post!

8th grader Quinn H. (Class of '18) writes...

"To create our 60th Logo contest, the first existing products we studied were the Principles of Design (Balance, Pattern, Movement, Rhythm, Unity, Contrast). This inspired us to make a rule that the entry must show a clear understanding of at least 3 Principles. We also looked at crest and flag examples, as many entries would be in the style of a crest of flag.  Another product we look at was a Logo Contest at Wellesley College.  It was original, included deadlines, advertising, and "How To" enter the contest.  This help me to see that our contest must be as innovative and new, and that Logos must be submitted according to the dates advertised!" -Quinn H.

A4 BRIEF: Cross Over (2/9/18)

Wave_the_Flag_A4_jpg

Now that these Design flags are actually helping your project, you have “crossed over” into Design thinking, and can use another timeless flag to simplify your thoughts.  You’ve done the research, but you may not be exactly sure how your are going to use it, or even what you learned.  So, to identify this info, we’re going to review our three research methods and figure out: How will each research method help us?

You might think, “I don’t need to use all of these methods,” or “It’s obvious what I learned,” but you want to put it all down on paper. People on your team may want to see it, or you may need to convince someone that your design challenge can be accomplished.  Using this design with fesses, or horizontal lines going across the flag, can help to identify high-potential and timeless concepts of our own.  This can be used during the fouth stage of Inquiring and Analysingjust like 8th grader Quinn R. did at the end of this post!

8th grader Quinn R. (Class of '18) writes...

“By researching a university’s logo design contest (Winona State University for my group), I learned how to write the guidelines for a design contest.  We can create our own rules, so others know the guidelines of our Whitby 60th logo contest.  By talking with my peers, I learned that the best ideas come from interaction.  You don’t always need to go to the internet for ideas!  I also researched the Principles of Design (Balance, Contrast, Movement, Pattern, Rhythm, Unity).  That way we can learn how to judge if a logo is outside of the box, just by using simple tricks to help us.” -Quinn R.

B1 SPECS: Commit to Change (2/16/18)

B1_image1

With this flag, I’m going to test you, on your knowledge of where your design is going. Do you know who will see your design? Do you know how they are going to use your design? You might have an idea on some of your objectives, especially if you completed the A1 NEED flag. But this excercise will allow us to go even deeper: What particular Audience, Objective, and Usage will you be committed to?

You might think, “My Design is for everyone- it can be used in lots of different ways.”  Wrong- I’m here to tell you that Broadcasting is out, Narrowcasting is in, so get specific with your intentions and your Design will have more impact.  Getting specific about the materials, resources, and function can bring clarity to your project, and help develop long-term thinking.  Describing the people who will use your design, and what it will accomplish, will help you focus on the most important parts.  This can be used during the first stage of Developing Ideas, just like 8th grader Matthew did at the end of this post!

8th grader Matthew (Class of '18) writes...

“Whitby’s Marketing Department asked the 8th grade to design a 60th Anniversary Logo Contest for the Whitby Community: 1st-8th grade, parents, and alumni.  We are designing this because the Marketing Department needed  a way to run this event.  For production, we will need Whitby students, project managers, and designs.  If we have lots of people enter in the contest, and create hype around the event, our contest will be a success.” -Matthew, Class of 2018

B2 IDEAS: Experiment (2/23/18)

Wave_the_Flag_B2_image2

It’s time to experiment a bit- this one’s more conceptual. Because it’s a Fess division (a line across the middle), the top half can represent how your design looks, or Form. The bottom half can represent how your design works, or Function. A design should have visual beauty, but should be functionally strong as well. My analogy is a tree: The top half, the leaves, is how it looks. The bottom half, the roots, is how it works.  Use the tree diagram to answer this question: How can the visual aspects of my design become functional as well?

You might think, “a tree has nothing to do with my design,” or, “I already know how it’s supposed to look,” but brainstorming in this way can help you to see the relationship between how your design looks, and how it works, or functions. An effective design is always highly functional, serving a very specific purpose. Using this flag design, we’ll create trees in the top part, with roots growing into the bottom part.  This can be used during the second stage of Developing Ideas, just like 8th grader Carolina F. did at the end of this post!

8th grader Carolina (Class of '18) writes...

“We have two ideas for announcing the Whitby’s 60th Logo Contest: posters and a video. We want to make our posters look minimalistic, because less is more, and viewers won’t have to read a lot to get the idea.  If the video looks student-run, it makes our school seem more independent.  If the logo submissions look professional, it will be a good representation of our school.  We can show dedication by using the winning logo continuously for Whitby’s 60th.” -Carolina F., Class of 2018

B3 PRESENT: Recruit Your Allies (3/2/18)

Wave_the_Flag_B3_image3

You did it! Using the Design Flags, you wrote a design brief, figured out design specs, and brainstormed a bunch of great ideas. Now we’re going to use these previous flags to help us create a presentation, on what we have so far. You may not know how these three things, your design brief, specs, and ideas, actually can work together, but this flag should help to make it more clear.

Make sure to have these 3 completed flags handy: A4, B1, and B2.  Also it helps to have the simple sentence that you created after filling out each sheet.  You might think that you can’t simplify this any more, OR I’m leaving out important info, BUT simplification is key to helping your audience understand your design intentions.  Plus, if your presentation is too long-winded, people could lose interest.  Use this flag for Developing Ideas and recruit your allies, just like 8th grader Taylor did at the end of this post!

8th grader Taylor (Class of '18) writes...

“We are creating this contest to notify people at Whitby School about Whitby’s 60th Anniversary.  Our objective is to promote Whitby, and get a logo design.  Our audience is those who went to celebrate Whitby’s 60th.  In order to create the contest, we learned ways people can submit their designs, and some other contest rules.  Our ideas are to to create a video and website where people can enter, and that will give information on due dates, deadlines, and will show images of logo examples!” -Taylor, Class of 2018

B4 DIAGRAM: Approach the Challenge (3/9/18)

Wave_the_Flag_B4_image

Before you present your design to the client, it’s important to come up with a digram with measurements, so that they can see what you are seeing in your head.  Also you may not be exactly sure what materials you are going to use, or what is meaningful about your design.  This sheet, using a flag with a border, will help you arrange your ideas into a concrete diagram that others can understand.

You might think the diagram isn’t necessary, or that you already know the materials needed.  However, clearly sketching specifics on what the design looks like is crucial to assuring any skeptic that your design is, in fact, the way to go.  Using the Border flag design, draw a representation of your design in the middle, and try to include as much info as possible about measurements, or, at least, proportions.  Use this for Developing Ideas and approach the challenge visually, just like 8th grader Alex did at the end of this post!

8th grader Alex (Class of '18) writes...

“For our Logo Contest, entries need to include the number 60 for our Milestone Event Celebration.  Also it needs to include Whitby’s brand name.  We made a time line to help contestants, and used bright paper to make posters.  Students can submit from 9/29/17 to 10/10/17.  People can vote from 10/17/17 to 10/20/17.  The winner of Whitby School’s 60th Anniversary Logo Design Contest will be selected on 10/23/17.  Then, the winner will be announced to the school!” -Alex, Class of 2018

B4_blog_image

C1 PLAN: Prepare (3/16/18)

C1_image2

Give yourself some piece of mind by taking time to plan. It lets you know what is ahead, and the time needed for each step. It can be hard to know where to start when creating a plan. If you break the project into only 4 steps, its easier to remember all of the stages. Its also easier to break down each step. If your project only has 3 steps, try to brainstorm an additional step at the end. This step can elaborate on presentation and use.

Having a great design isn’t enough on it’s own- it should be seen or used by others in some functional way. Much like a piece of concert music that needs to be played, a design needs to be used, to be truly functional. How will the target audience use your design? The Saltire Division flag, with diagonal lines going across from the corners, lets us organize this information in a circular, clockwise way.  You can use this to Create the Solution for your design, just like 8th grader Isabelle did at the end of this post!

8th grader Isabelle (Class of '18) writes...

“After figuring out our timeline, we needed to actually make the contest. For Step 1, we can exchange ideas with out color team during 1 class period.  We will use existing logo designs to get ideas for the contest.  For Step 2, we need to create rules and specs for our contest.  This might take 2 class periods, with 1 homework assignment in between, using ideas from Whitby’s Marketing Department.  For Step 3, we will announce and advertise our contest, with 1 homework assignment and 1 class period.  Our resources will be the school walls and the Whitby website.  During Step 4, we need to judge the entries in 1 class period.  For this, we can use the rules and rubric created in Step 2.” -Isabelle, Class of 2018

C2 SKILLS: Attempt (3/23/18)

Wave_the_Flag_C2_image

Design Flags can bring clarity to your project, and help you develop long term thinking that can lead to successful designs.  Up until this flag, each sheet has essentially stood on its own as a small piece of your project, just one slice of the work. But now, we have a chance to customize our flag from the start. Using B2 Fess Division flag, grab the best idea and make a brief statement about form and function. Maybe you’re thinking, “I completed the B2 Ideas sheet already, why do I need it again?”

It’s possible that you came up with a bunch of great ideas, but are not exactly sure how to use them. Focusing on very specific skills will help separate the steps you need to take, in order to reach your design goals. The completion of this flag will be no easy challenge, especially if you personally don’t have the skill required. Luckily, you can recruit others to your team as allies, to help you.  Use this flag during the second stage of Creating the Solution, just like 8th grader Seneca did at the end of this post!

8th grader Seneca (Class of '18) writes...

“Our best idea is to make the logo contest entry a mandatory homework assignment through Design class.  This will help our contest to function because if everyone submitted, there will be more logos to judge.  Some skills we will use to create the look of our contest are organization and efficiency skills, which we will use to make the logo entry specs.  Submissions must include the number 60, the word Whitby, and must be in black and white.  In order to make the contest work, we can judge using the Principles of Design (Balance, Contrast, Movement, Pattern, Rhythm, Unity).” -Seneca S.

C3 SOLUTION: Seize the Sword (3/30/18)

Wave_the_Flag_C3_image

For this activity, let’s look back at the C1 PLAN, your entire project boiled down to 4 steps.  Now, we can actually create the solution, and then hold ourselves accountable to the plan. It can be hard to keep track of exactly when each step was completed. However, it will mean accurate record keeping, which comes in handy later. This flag helps you realize what was actually accomplished, and discover anything that was left incomplete.

Pinpoint specifics about the actions in your plan, the time frame in which it was done, and double check that every part of your design has reached the highest possible quality. Include as many dates as possible, and use numbers in the details about what you have accomplished.  This flag gives you an opportunity to flesh out your recipe a bit more, making it easier to replicate the project (or something similar) if needed. In the middle, compose a brief statement about the solution that you created. This statement will help describe this project to others, and make it trasferrable.  You can use this to Create the Solution for your design, just like 8th grader Carolina did at the end of this post!

28_wave_the_flag_book_C3_jpg

8th grader Carolina R. (Class of '18) writes...

"We needed to create contest regulations, so we broke off into our color teams and using our research, made our own rules.  Then we needed to create criteria for judging.  We did this by using our existing knowledge about logo design.  Next, we created flyers and a video to advertise the contest.  This was done by having each 8th grader draw a poster that included the rules, criteria for judging, and general info, which was also posted on the Whitby website.  Our last step was to collect entries and judge them, to see which logos would make the final four.  Top do this, we took the criteria and used it to give each logo a score based on our rubric.  The four finalists were Lauren (Green), Ava (Yellow), Arianna (Red), and my sister, Victoria (Blue)!" -Carolina R.

Wave_the_Flag_C3_blog_post_template_jpg-1

C4 CHANGES: Adapt (4/6/18)

Wave_the_Flag_C4_image

Using a concept that we reviewed on sheets B2 IDEAS and C2 SKILLS, we’re going to elaborate more on form and function. It’s possible that you don’t know exactly what, if anything, to change on your design. This flag acts like a microscope: it breaks your design down into two different categories, form (what it looks like) and function (how it works), so we can determine what changes are needed for each.

You might think it’s perfect, and nothing needs to be changed, BUT if that’s the case, you can always walk your design backwards after the fact. At least you will know that you attempted to improve the look and functionality of the design. Think of it as an insurance policy. Besides, you will probably come up with a great way to change your design anyway! This flag helps you understand your design’s evolution before, and after, any changes.  Your reward will come in the form of a sentence about your design’s new look, and new functionality. Take that sentence and add it to your elevator pitch, it will go a long way!  Use this flag to Create the Solution for your design, just like 8th grader Griffin did at the end of this post!

wave_the_flag_book_C4_jpg

8th grader Griffin (Class of '18) writes...

“We made a few changes to our contest’s form and function.  At first, it was meant for the Upper School only, and we were going to have a cash prize.  Also the winning logo was supposed to be used for a “Save the Date” card.  Then we made some changes to our contest:  We involved grades 1-8, and instead of a cash prize, gave the winning team a no uniform day.  Instead of using the winning logo on a “Save the Date” card, we would now use it for other things: spirit wear, lamp post banners, and a ‘Flat Stanley’ idea.” -Griffin, Class of 2018

Wave_the_Flag_C4_blog_post_template_jpg

D1 TESTING: Rededicate (4/13/18)

D1_image2

It’s not going to be easy to test your design. One challenge will be avoiding the apathy that sometimes accompanies a completed project. Younger designers especially may want to STOP once a “solution” has been created. The thing is, at this point you are not fully aware of defects or even potential in your creation. Developing tests, based on Design Specs you have already created for yourself, can help to identify opportunities and threats for your design.

You probably thought your work was done BUT the testing phase is essential, since it will explore the reliability of your design. Also, it can help to ensure user satisfaction, and the quality of your product.  Come up with some testing methods that can gather data for each specific. Then, write one sentence that summarizes all of your tests, being sure to mention how you will measure each one.  Use this flag when Evaluating, just like 8th grader Sam did at the end of this post!

32_wave_the_flag_book_D1_jpg


8th grader Sam (Class of '18) writes...

“We can use our rubric to test entries from students interested in creating a logo.  Since our objective is to inform Upper Schoolers about what happens in the contest, we can tell them on when to vote for the final four.  For production, we can use the 7th & 8th grade assembly to announce how to vote for the 60th Logo Contest.  The logo will be used for marketing Whitby’s 60th.” -Sam, Class of 2018

Wave_the_Flag_D1_blog_post_template_jpg

D2 SUCCESS: Evaluate (4/20/18)

D2_image4

Sooo.... How did we do? Was our design a success? With this flag, we’ll focus on what went well with the project, and outline ways in which you accomplished your goals. Check out flag B1 SPECS, when you created specifics for your design. It’s possible to be successful in all of these areas, but let’s focus on the most successful parts.

You might think that it is arrogant to emphasize your project’s success, or that by highlighting your hard work, it might sound like bragging.  But, by sticking to the facts, and giving credit where credit is due, you can own your success without sounding like a narcissist.  Add evidence of success in the upwardly moving middle stripe. Your reward is a 3 point report that identifies the triumphs of your design. For the conclusion, fit these 3 points into one sentence, and focus on how your design was successful.  Use this flag design when Evaluating, just like 8th grader Julien did at the end of this post!

wave_the_flag_book_D2_jpg

8th grader Julien (Class of '18) writes...

“Our goal is to have a successful logo designed for Whitby’s 60th anniversary.  We also want to promote the milestone and raise awareness.  The logo is working well as it has been printed on stickers, Mayfair shirts, and even banners in the parking lot.  In conclusion, the Whitby 60th logo was successfully applied to many products, which promoted our anniversary.” -Julien, Class of 2018

Wave_the_Flag_D2_blog_post_template_jpg

D3 IMPROVE: Resurrect (4/27/18)

D3_image5

Making improvements to your design: Could you? Should you? Are you even aware of the ways in which your design could, or should, be improved? I know, you want to be finished with your design process. After all, it worked- you just completed a design flag (D2 SUCCESS) that outlines all of the successes of your project! BUT if you really want to help others through your design, try to identify any possible improvements NOW, or you may regret it in the future. This flag with the Bend Sinister Division helps you break down potential improvements into two categories: what could be improved, with a description, and what should be improved, with an explanation. 

It helps to know the difference between a description (statement with details) and an explanation (description that includes reasons). This sheet will help you see what can potentially be improved, and differentiate this from what should actually be changed. Focus on things that will make your design more comfortable for the user. It’s an opportunity to forget an improvement that is not necessary, then move ahead with a change that will in fact help your design.  Use this flag during the Evaluating stage of the Design Cycle, just like 8th grader Simon did at the end of this post!

36_wave_the_flag_book_D3_jpg

8th grader Simon (Class of '18) writes...

“We could improve how we informed the winner.  The winner of the contest would have won a prize but they did not know what the prize would be.  The reward changed from having the logo on a “Save the Date” card, to being on the May Fair t-shirts.  I think the contestant felt a little confused.  The contest design should be improved because it lets the contested know what they are getting if they win.  This is so that they have more of an incentive to participate.” Simon, Class of 2018
Wave_the_Flag_D3_blog_post_template_jpg-1

D4 IMPACT: Master (5/4/18)

D4_image4

This is it, the final reward. The last thing that the audience will see and hear. Better make it good! Not sure how to prove that your design is important? Show the user that your design helps them to survive, thrive, or even master their existence. Then, your creation will hold meaning. Skeptics may try to deny the importance of your design, BUT if you can identify facts, details, and reasons that your design has made an impact, the audience will believe you.

This flag with the Canton Design help you add written copy to the visual representation of your design.  Make the audience aware of what you have accomplished. String the facts, details, and reasons together, and write a sentence or two that wrap up your thoughts. This statement can be used to end your presentation... congratulations- you did it!  Use this flag when Evaluating, just like 7th grade contest winner Lauren did at the end of this post.  So, you still want to keep on designing? Pick one aspect of this project, and restart the Design Grid back at A1. Then, wave your flags, wave them loudly, proudly, and persistently! -Phil Lohmeyer, Upper School Design Teacher, Whitby School

wave_the_flag_book_D4_jpg

7th grader Lauren (Contest Winner) writes...

"I put a lot of planning into my design.  I think it made an impact in part because I was using the same crest as Whitby School, which brings unity to the logo and Whitby.  I used the same typestyle as WHITBY in all caps, which causes visual connections for the viewer as well as a mental impact.  Also I knew I wanted the 60th to be big, and wanted to use all of the Color Cup Challenge symbols in the design, so everyone feels included.  In addition I made an effort to use all of the Principles of Design (Pattern, Balance, Movement, Rhythm, Contrast, Unity).  The contest was successful because Upper Schoolers were required to submit, which caused a lot of entries!” -Lauren, Class of 2019

Wave_the_Flag_D4_blog_post_template_jpg

Thank you! (5/11/18)

thanks_image
Thank you to the administration of Whitby School, Jonathan Chein, Simone Becker, and Michelle Summers, for their help bringing WAVE THE FLAG: Project Management with Mr. Lohmeyer’s Design Flags (2017) to Whitby.  Thanks also to Arts Team Head Allyn Rathus and IB Coordinator Nicole Haver for their amazing leadership, and for their help managing the web presence of this project.  Thank you Sarah Mead and Josh Aromin in the Marketing Department for their assistance with this contest, and for creating spectacular promotional items.  Thanks to Tim Schwartz for consistently encouraging innovation in all forms.  Thanks to all 113 students who entered the contest, but especially the finalists: 5th grader Arianna N., 6th grader Ava V., 8th grader Victoria R., and contest winner, 7th grader Lauren L.  Lastly, thank you to the 8th graders.  These students are fantastic designers who ran an amazing and highly successful contest.  I am truly grateful for the opportunity to work with them on this monumental project.  Great job, Class of 2018! -Phil Lohmeyer, Whitby School Design Teacher 

thanks_image_2b

Whitby-60th-logo-blue-email-signature

Table of Contents