
The tools you purchase for your Makerspace will play a big role in defining the spirit of the space because they represent the range of opportunities being made available to students for exploration. The sum total of all the tools together define the breadth and depth of the thinking behind the space itself. However, the reality is that schools have to consider their options cautiously before stocking a Makerspace because different tools have different risks associated with them. This is the reason why some elementary and middle schools opt for supplying their Makerspaces with safer digital tools as opposed to the more risky analog ones.
The thinking behind the Makerspace at Whitby is based on the desire to provide students with opportunities to use a variety of tools that they don't ordinarily have access to in their daily lives. This includes some digital tools, but our main focus is on the analog ones. The wider the array of tools available to students, the more prompts for curiosity-driven exploration. This, in turn, creates opportunities for students to build, tinker and take things apart. These types of activities, when unconstrained, promote creativity and help students develop collaboration and problem-solving skills.
The following is a small selection of just some of tools we've placed in our Makerspace. They're the nine must-have tools that we see students going back to over and over again. Most of them are analog and dangerous so adult supervision is required. Some of these tools can have multiple functions. If you like this list then be sure to keep an eye out for our forthcoming list of the 33 Must-Have Supplies for a School Makerspace.
Nine Must-Have Makerspace Tools:
- Soldering Iron – This is a hot item in the Makerspace! Really, it goes up to 750 degrees Fahrenheit so students need explicit instruction to use.
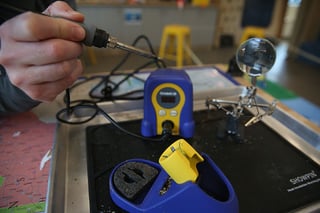 A soldering iron is a great tool to give students access to because it can provide opportunities to bridge the virtual and physical world, learn about the flow of electricity and even see physics in action. Students learning to solder can start with simple pre-fabricated circuit board kits that lead them to soldering more advanced circuit boards which require interfacing with a computer for programming. We even have students who use soldering irons to mint coins with clay molds or build paper clip sculptures.
 - Vice – We all depend on vices from time to time to support our desires.
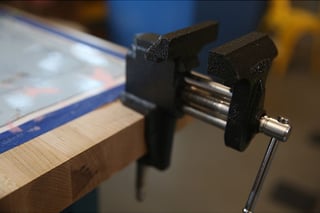 If your students are desiring to cut a big piece of wood then they'll need to stabilize it for safety purposes. This is why every Makerspace that promotes making with various materials needs to have a vice so students can stabilize the material or object they're working on. Think of it like having an extra set of hands—very heavy hands.
 -
Glue Gun – The great thing about a glue gun is the instant gratification you get from making one thing stick to another in seconds.
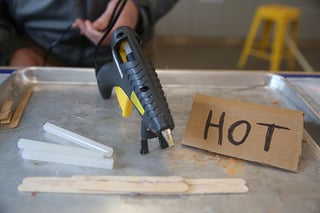 Students get great satisfaction from making two disparate elements connect together as well as from making the solid glue stick melt and then harden again. Don't get me wrong, there will always be a special place in my heart for Elmer's Glue and Rubber Cement, but they're just not the same. Students want to use the glue gun for pretty much every project so don't be surprised if the glue gun is on all the time and you constantly need to be ordering new glue sticks.
 - Knife Cutter –
Sometimes scissors just don't cut it! Cut it straight, that is. When you need to stick to the straight and narrow, knife cutters will give you more precision when cutting materials like paper or cardboard. And look for my list of safety equipment coming soon—which of course, will include no-cut gloves. - Sandpaper Block – Depending on the kind of wood you make available in your Makerspace, your students may end up with cut pieces of wood that are tough to hold on to because of sharp edges.
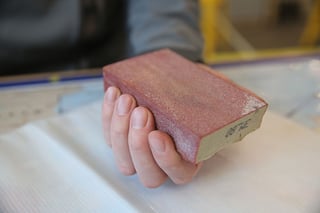 Students will need a way to smooth the edges to keep from getting splinters. This is where sandpaper can be helpful. Sandpaper blocks are a good alternative to plain old sandpaper for students with small hands because they're easier to hold and work with.
 - Wire Cutters – If you're providing opportunities for students to explore the world of electronics then you'll need a way for them to be able to cut or strip wires. Alternatively, if taking apart electronics is an activity being promoted in your Makerspace then you'll definitely need wire cutters.
- Utility Scissors – We're not talking about the utility scissors that your grandma used to cut the legs off of a turkey.
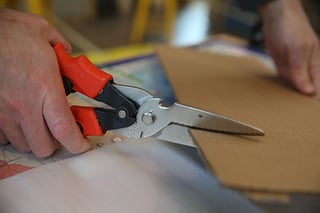 Sure, those were cool, but not nearly as cool as titanium coated shears that can cut through heavy duty materials like fabric, plastic, and metal.
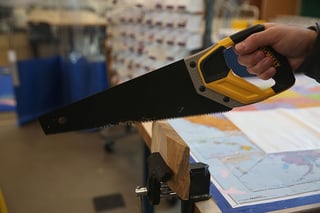
 - Saws – Students love to cut with saws. I'm not sure if it is the rhythmic back and forth motion that they find soothing or the animalistic satisfaction they get from cutting through a solid object. Either way, one thing is clear. The more saws you provide, the more things they'll want to cut. And, depending on the materials that the students want to work with, it's good to provide a few options so they can learn to choose the right tool for the right job. Here are three basic must-have saws to place in your Makerspace:
- Coping Saw – The stress of monitoring students with dangerous tools requires some kind of coping mechanism. Enter the coping saw.
 It won't help you cope with the stress of monitoring students, but the small blade will help students cut curved lines in wood.
 - Hand Saw – A small hand saw will be the go-to saw for most use cases when cutting wood. Be sure to get a smaller sized hand saw for the younger students.
- Hacksaw – There may not be a high demand for cutting metal, but it's still good to have a hacksaw for cutting pipes, cans, or nails.
- Coping Saw – The stress of monitoring students with dangerous tools requires some kind of coping mechanism. Enter the coping saw.
- Cordless Hand Drill – You've given students a saw and wood, and guess what they want to build now? If you guessed a small table or bench or chair then you're right! What do all of these projects have in common?
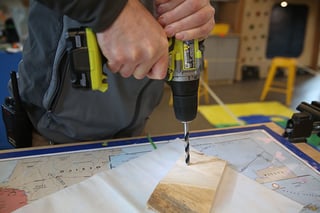 They all have legs that need to be attached. Some students may opt for nails, but the savvier ones know that screws are just a better way to go about it. If the wood is soft then students might be able to use a screw driver to put screws in, but a cordless drill will be much easier. Cordless hand drills aren't just for making it easier to drive screws into wood though, they're also good for drilling holes in various materials.
 A
A  If your students are desiring to cut a big piece of wood then they'll need to stabilize it for safety purposes. This is why every Makerspace that promotes making with various materials needs to have a
 Students will need a way to smooth the edges to keep from getting splinters. This is where sandpaper can be helpful.
  Sure, those were cool, but not nearly as cool as titanium coated shears that can cut through heavy duty materials like fabric, plastic, and metal.
 It won't help you cope with the stress of monitoring students, but the small blade will help students cut curved lines in wood.
 They all have legs that need to be attached. Some students may opt for nails, but the savvier ones know that screws are just a better way to go about it. If the wood is soft then students might be able to use a screw driver to put screws in, but a